
As an e-commerce store owner, one of the most critical aspects of your business is shipping. When you expand your operations internationally, shipping can become complex, and ensuring smooth operations across different regions is crucial. WooCommerce, a popular WordPress plugin for online stores, offers a powerful feature called Shipping Zones that can help streamline your international shipping process. In this guide, we’ll walk you through how to master WooCommerce Shipping Zones to optimize your global shipping strategy.
What Are WooCommerce Shipping Zones?
Shipping Zones are geographical regions that you define in your WooCommerce store. These zones allow you to customize shipping rates based on the destination country or region. By configuring different shipping zones, you can provide accurate, location-based shipping costs for customers around the world.
For example, you may have one set of shipping rules for the United States, another for Europe, and a separate one for Asia. By leveraging this feature, you can easily offer region-specific shipping rates, delivery options, and pricing strategies, making it more convenient for international customers to shop from your store.
Why Use Shipping Zones in WooCommerce?
There are several reasons why you should use WooCommerce Shipping Zones for your international shipping:
- Accurate Shipping Rates: Shipping rates vary depending on the destination, weight, and size of the package. Shipping Zones allow you to create region-specific rates, so your customers know exactly how much they’ll pay at checkout.
- Custom Shipping Methods: Different regions may require different shipping methods. For instance, you may offer free shipping within the US, but charge for international orders. Shipping Zones give you the flexibility to define shipping methods like flat rate, free shipping, or local pickup for different areas.
- Improved Customer Experience: By offering accurate shipping rates and options, customers are more likely to trust your store and complete their purchase. A seamless checkout experience is crucial to reducing cart abandonment rates.
- Easier International Expansion: As your store grows and you begin to ship internationally, you can easily adjust your shipping strategies for different countries. WooCommerce allows you to manage multiple shipping zones without any hassle.
In addition to optimizing shipping strategies, protecting your store from malicious fraud is equally important. Malicious users can disrupt your shipping process and harm your business. To safeguard your store, consider taking proactive steps, such as learning how to blacklist malicious fraud users in WooCommerce, which can help prevent fraudulent activity from interfering with your international operations.
Setting Up Shipping Zones in WooCommerce
#1 – Access Shipping Zones:
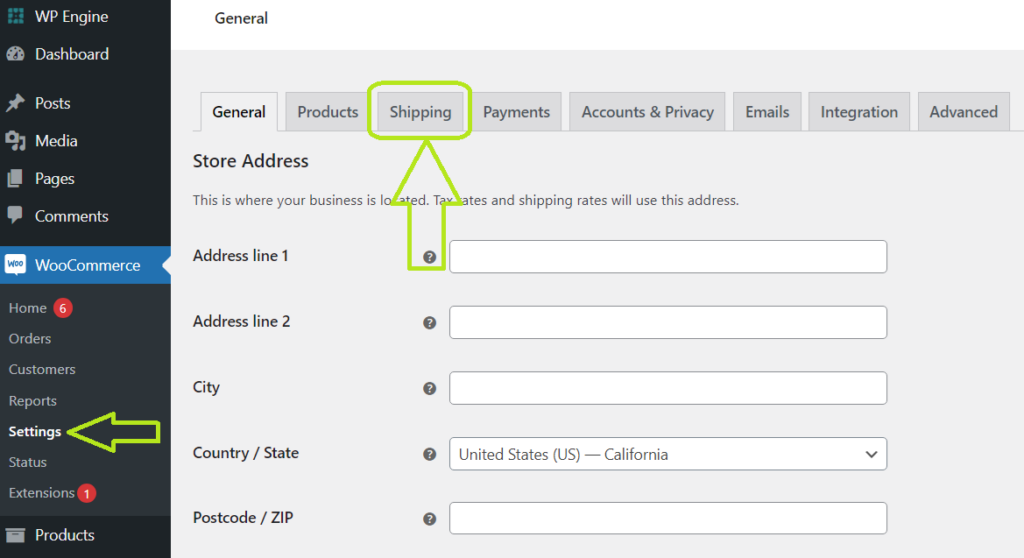
- Start by logging into your WordPress dashboard. In the left sidebar, hover over WooCommerce and click on Settings.
- From the tabs at the top, select Shipping. This will take you to the main shipping settings page.
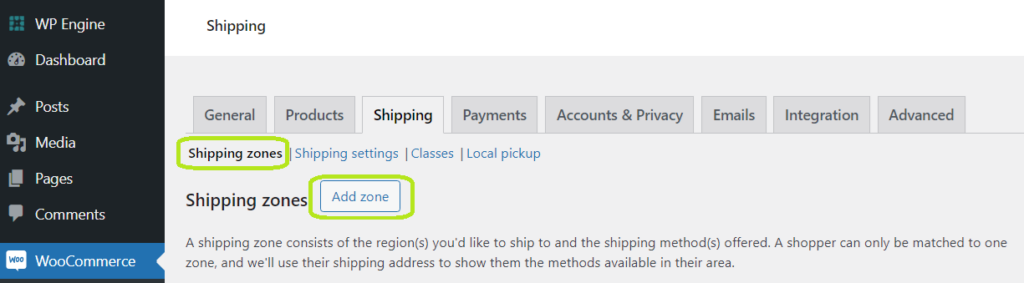
- Click on the Shipping Zones tab to access the zone management area.
#2 – Add a New Zone:
- On the Shipping Zones page, click the Add shipping zone button at the top.
- You’ll be presented with a new screen where you can configure your zone.
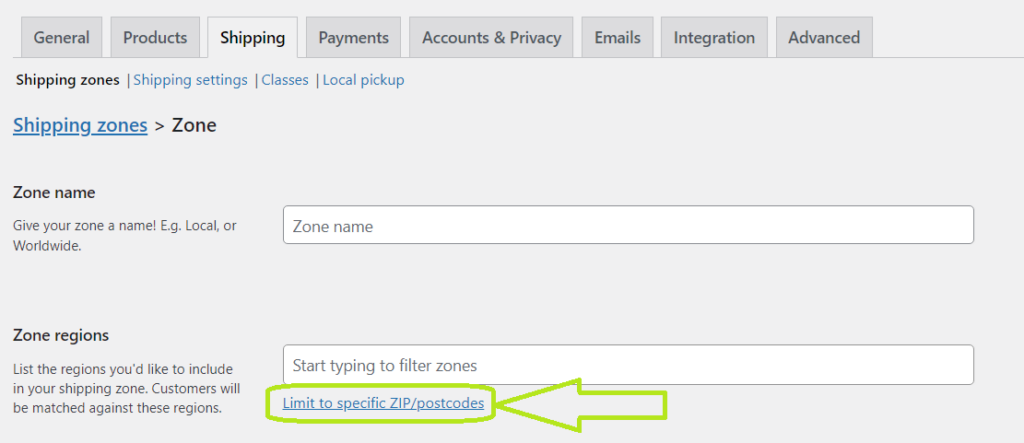
#3 – Define Zone Regions:
- Enter a Zone name that clearly describes the geographical area you’re targeting (e.g., “North America,” “Europe,” “Domestic”).
- Under Zone regions, start typing the name of the country, continent, or region you want to include. WooCommerce will suggest options as you type. You can select multiple regions to include in this zone.
#4 – Limit to Specific Postal Codes (Optional):
- If you want to narrow down the zone further, click on the Limit to specific zip/postcodes link.
- Enter the specific postal codes or zip codes, one per line, that you want to include in this zone. You can also use wildcards (e.g., 902*) to match a range of codes.
#5 – Add Shipping Methods:
- Click the Add shipping method button to choose the shipping options you want to offer for this zone.
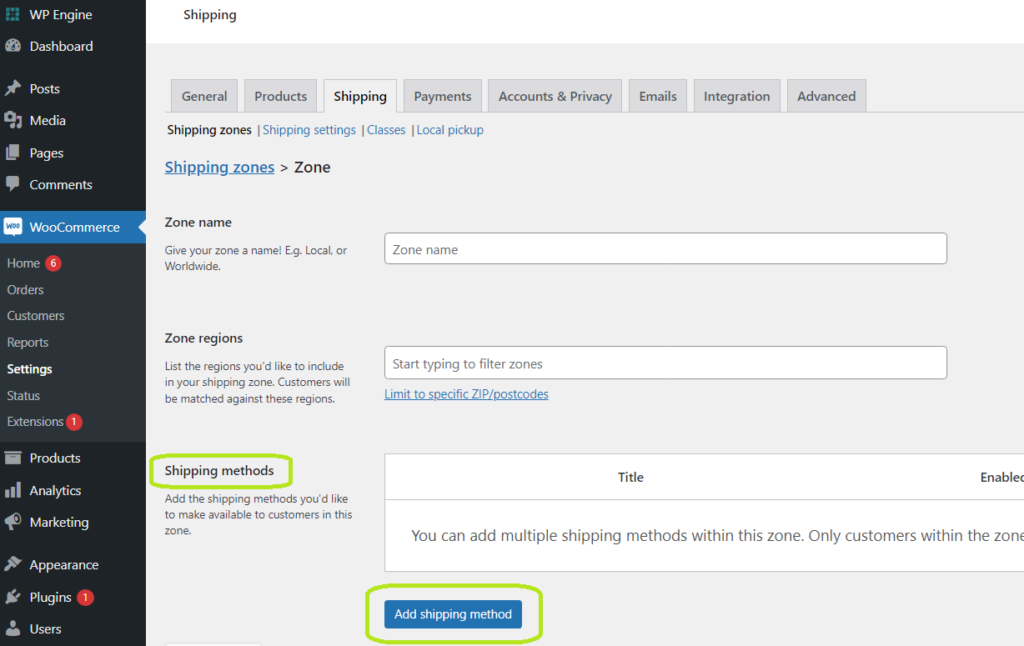
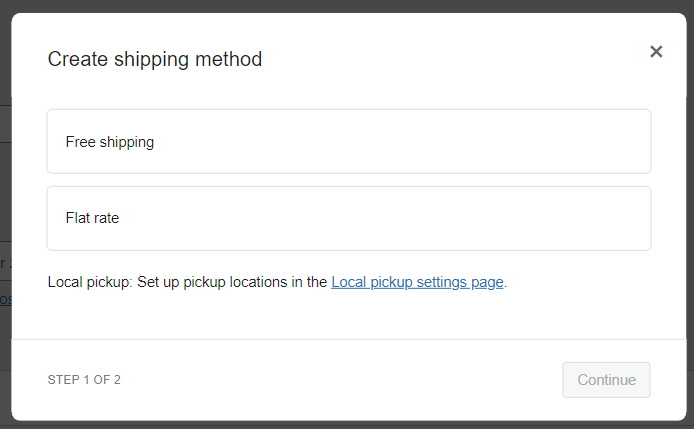
- WooCommerce provides built-in options like Flat Rate, Free Shipping, and Local Pickup. If you have installed shipping plugins, you’ll see additional methods available.
- For each method, click Add shipping method, then configure the settings as needed.
| Pro Tip: If you’re using a currency conversion plugin like Aelia Currency Switcher for WooCommerce, you can take advantage of its ability to set currency-specific prices for these shipping methods. This allows for even greater precision and flexibility in your international shipping rates. |
#6 – Save Changes:
- Once you’ve configured your shipping methods, click Save changes to finalize your new shipping zone.

Advanced Shipping Zone Tips for International Shipping
1. Use a Shipping Plugin for More Options
While WooCommerce offers basic shipping functionality, many store owners turn to third-party shipping plugins to expand their options.
2. Offer Free Shipping for Specific Countries
You can incentivize international customers by offering free shipping to specific regions or countries. For instance, you might offer free shipping to customers in the EU for orders over a certain amount. This can be a great way to attract customers from high-demand regions.
3. Set Up Shipping Taxes for Different Regions
In some countries, shipping costs are subject to tax. WooCommerce allows you to set up taxes for different regions under WooCommerce > Settings > Tax. Be sure to configure tax settings for each shipping zone accordingly, especially when dealing with international shipping. To simplify tax calculations and improve the customer experience, you can use the Tax Display by Country for WooCommerce plugin, which helps display tax-inclusive prices based on the customer’s location.
4. Consider Currency Conversion
When shipping internationally, currency conversion can play a significant role in pricing. You can use a WooCommerce currency plugin to automatically convert prices to the customer’s local currency. This ensures that customers can see and pay the price they expect without needing to deal with exchange rates.
Common Mistakes to Avoid with Shipping Zones
- Not Updating Shipping Rates: Shipping costs can fluctuate, especially with international orders. Be sure to regularly review and update your shipping rates to stay competitive.
- Ignoring Shipping Restrictions: Some countries may have restrictions on certain products. Always check whether you can legally ship to a specific country and configure shipping zones accordingly.
- Not Accounting for International Customs Fees: When shipping internationally, customs duties and taxes can apply. Ensure that you inform your customers about potential additional costs, and consider how these fees will be handled at checkout.
- Overcomplicating Shipping Methods: While it’s great to offer various shipping methods, it’s essential to keep the options simple. Too many options can confuse customers and lead to abandoned carts.
Additionally, it’s important to keep fraudulent activity in check when shipping internationally. Blacklister for WooCommerce can help protect your store by blocking malicious users based on specific behaviors, such as location or IP address. This tool ensures that your shipping zones are only accessed by legitimate customers, helping you maintain both security and efficiency when handling international orders.